依照慣例,我們實作過 製作 macOS Sierra 10.12 的開機隨身碟及 ISO 映像檔 跟 製作 OS X 10.11 El Capitan 的安裝用隨身碟及 ISO 映像檔。
現在,又到該更新的時候了。
2017/09/13 凌晨一點,WWDC 2017 公佈了最新的 macOS 10.13 High Sierra 正式版發佈時間。
對!就是今天 2017/9/26。
我認為這次升級最大的亮點無非是 APFS (Apple File System) 了,它在 iOS 10.3 首先被採用,最棒的部份就是在存取速度加快的超有感,以及可用空間變多了。
硬體需求
根據 Apple 官方資料,這些機型可以進行升級:
- MacBook 2009 年底及後續機型
- MacBook Pro 2010 年中及後續機型
- MacBook Air 2010 年底及後續機型
- Mac Mini 2010 年中及後續機型
- iMac 2009 年底及後續機型
- Mac Pro 2010 年中及後續機型
機型可以在左上角「」主選單的「關於這台 Mac」裡,「概覽」頁籤就可以看到了。
軟體需求
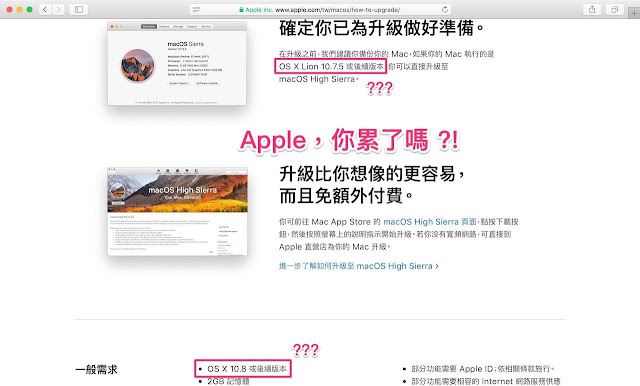
只要是 OS X Lion 10.7.5 以上的版本,就可以直接無痛升級。
(這邊有個 Bug,上面寫 10.7.5,下面寫 10.8 .... XDDD)
2018/1/12 更新:Apple 發現了這個錯誤,正確的版本要求是 10.8 Mountain Lion。
我們可以從 Mac App Store 或是打開 macOS High Sierra 的連結,都可以開始下載。
下載完畢之後,就可以在「應用程式」裡看到它了。
製作開機隨身碟
老規矩,百年不變的指令依然適用,只是檔名要稍微改一下而已。
sudo /Applications/Install\ macOS\ High\ Sierra.app/Contents/Resources/createinstallmedia --volume /Volumes/USB --applicationpath /Applications/Install\ macOS\ High\ Sierra.app/ --nointeraction
別忘了把「USB」這個字改成你自己的隨身碟名稱。
當然也可以用 DiskMaker X 來製作,就只要動動滑鼠就行了。
轉成 ISO 映像檔
轉換指令跟 10.12 的時代也是大同小異。
hdiutil attach /Applications/Install\ macOS\ High\ Sierra.app/Contents/SharedSupport/InstallESD.dmg -noverify -mountpoint /Volumes/highsierra
hdiutil create -o /tmp/HighSierraBase.cdr -size 7316m -layout SPUD -fs HFS+J
hdiutil attach /tmp/HighSierraBase.cdr.dmg -noverify -mountpoint /Volumes/install_build
asr restore -source /Applications/Install\ macOS\ High\ Sierra.app/Contents/SharedSupport/BaseSystem.dmg -target /Volumes/install_build -noprompt -noverify -erase
cp -R /Volumes/highsierra/Packages /Volumes/OS\ X\ Base\ System/System/Installation
hdiutil detach /Volumes/OS\ X\ Base\ System/
hdiutil detach /Volumes/highsierra/
mv /tmp/HighSierraBase.cdr.dmg /tmp/BaseSystem.dmg
hdiutil create -o /tmp/HighSierra.cdr -size 8965m -layout SPUD -fs HFS+J
hdiutil attach /tmp/HighSierra.cdr.dmg -noverify -mountpoint /Volumes/install_build
asr restore -source /Applications/Install\ macOS\ High\ Sierra.app/Contents/SharedSupport/BaseSystem.dmg -target /Volumes/install_build -noprompt -noverify -erase
cp /tmp/BaseSystem.dmg /Volumes/OS\ X\ Base\ System
hdiutil detach /Volumes/OS\ X\ Base\ System/
hdiutil convert /tmp/HighSierra.cdr.dmg -format UDTO -o /tmp/HighSierra.iso
mv /tmp/HighSierra.iso.cdr ~/Desktop/HighSierra.iso
rm /tmp/HighSierra.cdr.dmg
最後,我們就可以在桌面上看到 High Sierra 的 ISO 映像檔了。
參考資料
- Apple - 為 OS X 建立可開機安裝程式
- GitHubGist - Create bootable ISO from HighSierra Installer
- Macworld - How to create a bootable macOS High Sierra installer drive
圖片來源
更新紀錄
- 2017/09/26 撰文。
- 2018/1/12 更新。


為何10.10 10.12 10.13的製作方式都有點不一樣?
回覆刪除是否可以一種通用?
概念上大同小異,只是差別在檔名的不同和小部份參數的調整。
刪除Here is download link for macOS High Sierra 10.13.1 ISO Installer on Google Drive
回覆刪除https://goo.gl/DhsHTy
Thanks for your information...
刪除简单方便 官方dmg制作iso 小体积 原生。。。@seamac
回覆刪除1、将官方install dmg app安装包放到”应用程序“文件夹。
2、如有创建失败,请加大磁盘大小建议大于5530mb。
3、保留系统可用富裕空间,防止创建缓存磁盘失败。
—————————Mac OSX 10.12原盘制作iso——————————
hdiutil create -o /tmp/Sierra.cdr -size 5530m -layout SPUD -fs HFS+J
hdiutil attach /tmp/Sierra.cdr.dmg -noverify -mountpoint /Volumes/install_build
sudo /Applications/Install\ macOS\ Sierra.app/Contents/Resources/createinstallmedia --volume /Volumes/install_build --applicationpath "/Applications/Install macOS Sierra.app"
mv /tmp/Sierra.cdr.dmg ~/Desktop/InstallSystemSierra.dmg
hdiutil detach /Volumes/Install\ macOS\ Sierra
hdiutil convert ~/Desktop/InstallSystemSierra.dmg -format UDTO -o ~/Desktop/Sierra.iso
mv ~/Desktop/Sierra.iso.cdr ~/Desktop/ISO_Sierra.iso
rm ~/Desktop/InstallSystemSierra.dmg
—————————Mac OSX 10.13原盘制作iso————————————
hdiutil create -o /tmp/HighSierra.cdr -size 5530m -layout SPUD -fs HFS+J
hdiutil attach /tmp/HighSierra.cdr.dmg -noverify -mountpoint /Volumes/install_build
sudo /Applications/Install\ macOS\ High\ Sierra.app/Contents/Resources/createinstallmedia --volume /Volumes/install_build
mv /tmp/HighSierra.cdr.dmg ~/Desktop/InstallSystemHSierra.dmg
hdiutil detach /Volumes/Install\ macOS\ High\ Sierra
hdiutil convert ~/Desktop/InstallSystemHSierra.dmg -format UDTO -o ~/Desktop/HighSierra.iso
mv ~/Desktop/HighSierra.iso.cdr ~/Desktop/ISO_HighSierra.iso
rm ~/Desktop/InstallSystemHSierra.dmg
我在VMware Workstation使用上述指令轉換的ISO檔安裝MAC OS時發現一點狀況,當我的虛擬機網路沒有連接時無發安裝,會顯示無法與伺服器連線,當我把網路給連接上去後則正常,後續我故意在安裝的時候將網路段開,安裝則會停止,也就是說並沒有從ISO檔上安裝OS,反而是從網路上下載安裝,是否指令上有什麼漏掉的?
回覆刪除app store 下載的 high sierra格式好像改了喔!
回覆刪除大小只有22MB 裡面也沒有shareSupport資料夾
無法用指令抓
只能看看有沒有有緣人肯釋出了
刪除